If you are a web developer then you most likely have used PHP in your numerous web applications but did you know that you can spin up a command-line application using PHP within no time?! Let me show you how to build a command-line application using PHP and a famous Composer package called Symphony/Console.
The Console Component (Symphony/Console) is a PHP Composer package. It eases the creation of beautiful and testable command-line applications. It provides features such as argument specification (optional/required) and option specification ( using — notation) out of the box!. So let’s get started with building our application.
We will build a customary “Hello World” console app but modify it slightly to support a custom greeting (in place of Hello) and have it optionally greet a person (instead of the world!).
The Hello World App Will:
- Provide us a single
greetcommand which we will use to interact with the application. greetcan accept an optional argument (name) to print out a greeting to the person (default is World).greetcan accept an option (–say) to change the greeting message (default is Hello).- If no arguments or options are specified give us a default
Hello worldmessage.
How to Build a Command-Line Application Using PHP:
-
Create a new directory for our project and
cdinto it: ` -
Require the Console Component into our project using Composer. `
-
Now create an entry point to your application. A PHP extension is not necessary as we are going to make this file executable and specify the environment in the file itself. `
-
Add the code below to
HelloWorldfile ( I will explain what each line does in a moment!) and execute theHelloWorldapp in your terminal.#!/usr/bin/env php <?php require __DIR__.'/vendor/autoload.php'; use Symfony\Component\Console\Application; use Symfony\Component\Console\Input\InputArgument; use Symfony\Component\Console\Input\InputInterface; use Symfony\Component\Console\Input\InputOption; use Symfony\Component\Console\Output\OutputInterface; (new Application('Hello World', '1.0.0')) ->register('greet') ->addArgument('name', InputArgument::OPTIONAL, 'Name of the person') ->addOption('say', null, InputOption::VALUE_REQUIRED, 'Custom greeting') ->setCode(function (InputInterface $input, OutputInterface $output) { $name = $input->getArgument('name'); $greeting = $input->getOption('say'); if (!empty($name) && !empty($greeting)) { return $output->writeln("<info>$greeting $name!</info>"); } else if (!empty($name)) { return $output->writeln("<info>Hello $name!</info>"); } else if (!empty($greeting)) { return $output->writeln("<info>$greeting World!</info>"); } else { return $output->writeln("<info>Hello World!</info>"); } }) ->getApplication() ->run();Voilà! and that is it. You have your
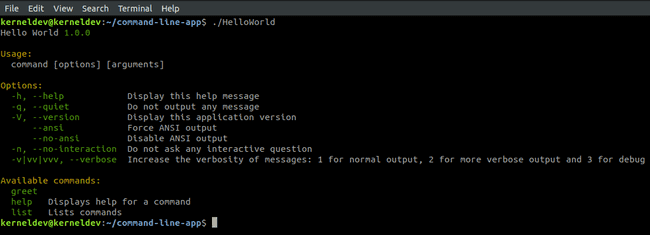
HelloWorldConsole application.The Symfony Console Component provides our app with several options and commands such as
help,listand–versionout of the box!
Explain This Sorcery Human!
Okay, Let’s take a look at the code in our HelloWorld file.
-
We require the
autoload.phpprovided by the composer forautoloadingand also the various features provided by the Console component.InputInterfaceandOutputInterfacewill facilitate the input and output functionalities of the application and similarlyInputArgumentandInputOptionwill help us process the options and arguments passed to our HelloWorld application.require __DIR__.'/vendor/autoload.php'; use Symfony\Component\Console\Application; use Symfony\Component\Console\Input\InputArgument; use Symfony\Component\Console\Input\InputInterface; use Symfony\Component\Console\Input\InputOption; use Symfony\Component\Console\Output\OutputInterface; -
Instantiate a new
symphony/consoleapplication by the nameHelloWorld (v1.0.0)and register ourgreetcommand.(new Application('Hello World', '1.0.0'))->register('greet') -
We add an optional
nameargument (addArgument()) and also provide a short description of the argument. We then add an optionsayusing theaddOption()method. Note that options are always optional but you can either specify the options to be passed with a value or they can also be used just as a flag which will specify aboolean.->addArgument('name', InputArgument::OPTIONAL, 'Name of the person') ->addOption('say', null, InputOption::VALUE_REQUIRED, 'Custom greeting') -
The code in
setCode()method will contain the main logic of our app. It will print out a greeting to the terminal depending upon the argument and options passed also notice that we get the options and arguments passed to thegreetcommand using thegetArgument()andgetOption()helper methods on the$inputobject. We then simply check which arguments or options were passed and print a greeting to the console output (using the$outputobject) accordingly. Thewritelnmethod can format the output to different colors based on tags such asinfo, errorand `warning.->setCode(function (InputInterface $input, OutputInterface $output) { $name = $input->getArgument('name'); $greeting = $input->getOption('say'); if (!empty($name) && !empty($greeting)) { return $output->writeln("<info>$greeting $name!</info>"); } else if (!empty($name)) { return $output->writeln("<info>Hello $name!</info>"); } else if (!empty($greeting)) { return $output->writeln("<info>$greeting World!</info>"); } else { return $output->writeln("<info>Hello World!</info>"); } }) -
We finally bootstrap the application using
getApplication()and call therun()method on it so that it will be ready to accept and process outgreetcommand.->getApplication()->run();
Now Let’s See Our Hello World App in Action!
-
The
greetcommand without any arguments or options passed. -
greetwith an optionalnameargument. -
greetwith a custom greeting. -
Finally,
greeta person with a custom greeting!
So that’s it! You have your command line application in a jiffy! You can find the complete source code in my GitHub repo.
So what do you think? Share your thoughts in the comment section below!


