Editor’s Note: This post was initially published for older versions of Laravel and has been updated to work with the current version ( v7+).
Many a time in a web application, you will need to protect specific resources from being accessed by all of your users. While an authentication system ensures that only authorized users can access your application, but implementing precise role-based access control is sometimes necessary. Let me show you how you can implement role based access control in Laravel.
We will not be using any external packages and use Laravel Middlewares to implement this. We will be applying access control for three roles, namely Admin, Agent, and Customer for the User model provided by Laravel.
Set up Migrations:
-
Add a new
rolecolumn to our existing user migration:Schema::create('users', function (Blueprint $table) { $table->increments('id'); $table->string('name'); $table->string('email')->unique(); $table->string('password'); $table->string('role');// the role column $table->rememberToken(); $table->timestamps(); }); -
Run the migrations to generate the tables:
-
php artisan migrateNote: If you have already created the tables before, you may need to run
php artisan migrate:refreshbut be aware that this command will reset all your tables! And then re-run all your migrations.
Customize the Registration Form:
-
Generate the authentication scaffolding which comes bundled with Laravel.
php artisan make:auth -
Now that we have added the
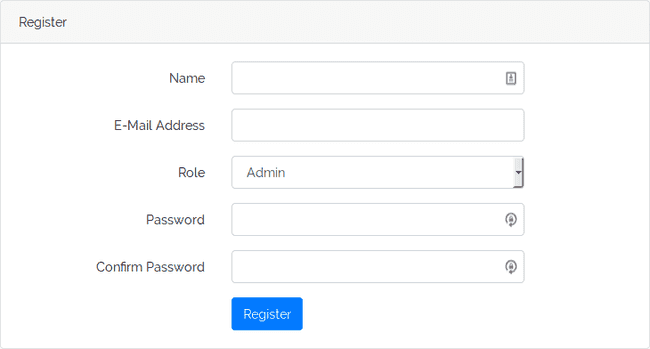
rolecolumn to our User model we also need to add the input for the roles in our view so add the select tag input toresources/views/auth/register.blade.php‘s registration form.<div class="form-group row"> <label for="role" class="col-md-4 col-form-label text-md-right">Role</label> <div class="col-md-6"> <select name="role" class="form-control" > <option value="admin">Admin</option> <option value="agent">Agent</option> <option value="customer">Customer</option> </select> </div> </div>
Customise User Model and Register Controller:
-
Add the role column to
fillableattribute on the User Model so that we can make use of thecreate()method in Register Controller.//User.php protected $fillable = [ 'name', 'email', 'password','role', ]; -
Now customize
RegisterController.phpwhich is inapp/Http/Controllers/Authdirectory to include ourroleinput when creating a new user.-
Add a validation rule for the
rolefield:protected function validator(array $data) { return Validator::make($data, [ 'name' => 'required|string|max:255', 'email' => 'required|string|email|max:255|unique:users', 'password' => 'required|string|min:6|confirmed', 'role' => 'required|in:admin,agent,customer', //validate role input ]); } -
Add role field to the
create()method:protected function create(array $data) { return User::create([ 'name' => $data['name'], 'email' => $data['email'], 'password' => bcrypt($data['password']), 'role' => $data['role'], ]); }
-
Now you should be able to register users with different roles. We’ll create at least one user per each role, and we will move on to implementing the access control logic.
Set-up middlewares:
Middleware provides a convenient mechanism for filtering HTTP requests entering our application. For example, Laravel includes an auth middleware that verifies the user of your application is logged-in.
-
We will create middlewares for each of our roles.
php artisan make:middleware Admin php artisan make:middleware Agent php artisan make:middleware Customer -
Add the following code to respective middlewares which are in
app/Http/Middlewarefolder:-
Admin.php:
use Auth; //at the top function handle($request, Closure $next) { if (Auth::check() && Auth::user()->role == 'admin') { return $next($request); } elseif (Auth::check() && Auth::user()->role == 'agent') { return redirect('/agent'); } else { return redirect('/customer'); } } -
Agent.php:
use Auth; //at the top function handle($request, Closure $next) { if (Auth::check() && Auth::user()->role == 'agent') { return $next($request); } elseif (Auth::check() && Auth::user()->role == 'customer') { return redirect('/customer'); } else { return redirect('/admin'); } } -
Customer.php:
use Auth; //at the top

function handle($request, Closure $next)
{
  if (Auth::check() && Auth::user()->role == 'customer') {
      return $next($request);
  }
  elseif (Auth::check() && Auth::user()->role == 'agent') {
      return redirect('/agent');
  }
  else {
      return redirect('/admin');
  }
}
-
-
Now let’s register our middleware with Laravel. Add the middleware classes to
<span class="token variable">$routeMiddleware</span>property located inapp<span class="token operator">/</span>Http<span class="token operator">/</span>Kernel<span class="token punctuation">.</span>php:protected $routeMiddleware = [ // ... 'admin' => 'App\Http\Middleware\Admin', 'agent' => 'App\Http\Middleware\Agent', 'customer' => 'App\Http\Middleware\Customer', ];Now you can apply these middlewares to routes or to the controller itself:
-
web.php:
Route::get('/admin', function(){ echo "Hello Admin"; })->middleware('admin'); Route::get('/agent', function(){ echo "Hello Agent"; })->middleware('agent'); Route::get('/customer', function(){ echo "Hello Customer"; })->middleware('customer'); -
Or you can specify a middleware in a controller’s constructor, like this:
public function __construct()
{
  $this->middleware('auth');
    $this->middleware('admin');
}
Redirect User After Log-In:
If you use Laravel’s default login setup, you may want to redirect the user to his role specific page after he logs in. and you can do that by overriding the redirectTo() method in your LoginController.php. Make sure you remove the $redirectTo property from your LoginController.php.
Add This to Your LoginController.php:
protected function redirectTo( ) {
    if (Auth::check() && Auth::user()->role == 'customer') {
        return('/customer');
    }
    elseif (Auth::check() && Auth::user()->role == 'agent') {
        return('/agent');
    }
    else {
        return('/admin');
    }
}
That’s it; we have successfully implemented role-based access control in Laravel! And you can adapt this method for as many or as few of the roles you might need.
The example project used in this tutorial is available in my GitHub repository.

